An Error Has Occurred Try Again or Contact Your System Administrator Sailpoint
Managing User Access and Accounts
You can manage the access that users have to IdentityNow in a number of ways. You can require them to sign in using multifactor authentication (MFA), grant or remove their administrative access, temporarily remove them from IdentityNow, and disable and enable user identities. Access can also be governed by disabling and unlocking user accounts.
Signing in Using Multifactor Authentication
You can require users to use an external mobile authenticator to sign in to IdentityNow. This will provide an additional layer of security for your organization and users.
Note
This is different from using two-factor authentication for password updates and authentication. To configure that, you must have IdentityNow as your service provider and select the option as a sign-in method.
To configure multifactor authentication for identities:
-
From the Admin console, select Identities > Identity Profile.
-
Select the identity profile you want to configure to use MFA.
-
Under Sign-in Method, select Multifactor Authentication.
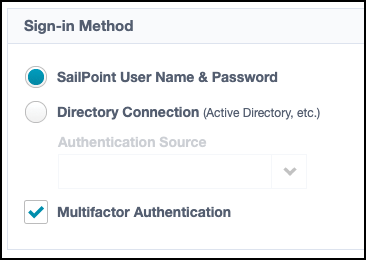
This will disable the Strong Authentication Methods options.
The next time users on that source try to sign into IdentityNow, they will be prompted to set up their mobile device with an external authenticator. Administrators will not be required to enter additional authentication to access the Admin interface.
Resetting Multifactor Authentication
A user's MFA can be reset by them in IdentityNow or by an admin from the identity action menu.
-
From the Admin console, select Identities > Identity List.
-
Select the identity you want to reset MFA for.
-
Select the Actions icon
 .
. -
Select Reset MFA and confirm.
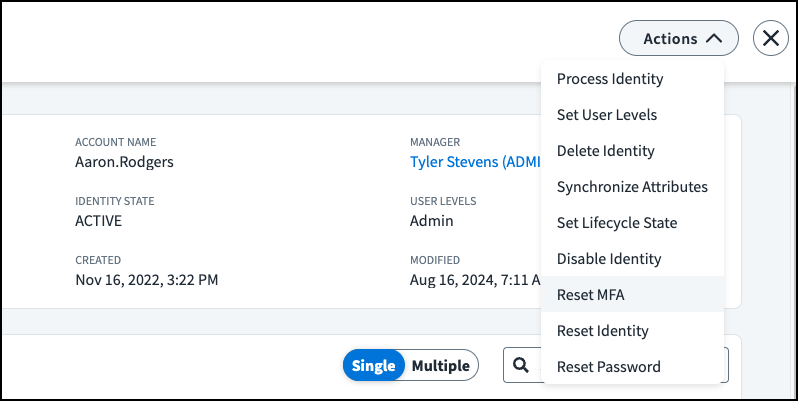
The user must set up their mobile authenticator on their next sign in.
Managing User Access
You may need to change the access levels that users have to IdentityNow. This could be because of a shift in administrative needs, concerns about compromised accounts, or errors with accessing the application.
Granting or Removing Admin Access
You can grant or remove admin privileges for users to determine who has access to the Admin interface.
Note
Before you remove access, you may want to generate a report to see which identities have admin permissions.
To grant or remove administrative privileges from a single user:
-
In the Admin interface, select Identities > Identity List.
-
Select the name of the user for whom you want to change access.
-
Select the Actions menu (
) and choose Grant Admin or Remove Admin.
This will toggle if the Admin interface is available or not.
To change admin access for multiple users simultaneously:
-
In the Admin interface, select Identities > Identity List.
-
Select the checkboxes next to the users for whom you want to change access.
-
Select the Actions menu (
) and choose Grant Admin or Remove Admin. 
Note
You can also manage the Admin IdentityNow entitlements in the aggregated set of entitlements associated with that source.
Temporarily Removing a User from IdentityNow
You might need to temporarily remove a user from IdentityNow for a few reasons:
-
Their status is listed as ERROR in the Identity List and their identity details page.
-
They are having problems signing in to IdentityNow.
-
You've discovered correlation problems with their accounts.
Note
Please coordinate with your SailPoint customer support specialist for assistance with resolving these issues.
By temporarily removing users from the IdentityNow database, you can resolve the underlying problem on the source and then do a full aggregation. After their authoritative source is reaggregated, they are added to the list of identities as a new user.
For example, users with the ERROR status might have an account in the authoritative source used to create the profile, but they do not have an account in the authentication source you selected in Directory Connection.
You must resolve this issue before you can send these users invitations to register with SailPoint.
Important
Identities that are set as the owners of sources, roles, or apps cannot be removed or disabled. You will see an error if you attempt to take these actions on an owner. Select a new owner to remove these identities.
To temporarily remove a single user from IdentityNow:
-
In the Admin interface, select Identities > Identity List.
-
Select the name of the identity you want to remove.
-
Select the Actions menu (
) and choose Remove Identity. A message appears reminding you that taking this action removes the identity from IdentityNow and re-adds it at the next full aggregation. -
Select Yes to remove the user identity from IdentityNow.
To temporarily remove multiple users simultaneously:
-
In the Admin interface, select Identities > Identity List.
-
Select the checkboxes next to the identities you want to remove.
-
Select the Actions menu (
) and choose Remove Identities. 
A message appears reminding you that taking this action removes the identities from IdentityNow and re-adds them at the next full aggregation.
-
Select Yes to remove the user identities from IdentityNow.
Once you have removed the user(s), resolve any issues related to their account or authentication sources. If applicable, ensure that delta aggregationhas been turned off for the related sources prior to the next aggregation.
Disabling User Identities
Disabling users allows you to immediately remove privileges for a user who has left the company if their departure has not yet been processed by the authoritative source.
Notes
Disabling an identity does not end any active sessions the user has. Before disabling their identity, consider whether it might be more appropriate to disable a user's account on a source.
Users whose identity is disabled cannot change their passwords.
To disable a single user:
-
In the Admin interface, select Identities > Identity List.
-
Select the name of the user you want to disable.
-
Select the Actions menu (
) and choose Disable Identity.
To disable multiple users simultaneously:
-
In the Admin interface, select Identities > Identity List.
-
Select the checkboxes next to the users you want to disable.
-
Select the Actions menu (
) and choose Disable Identities.
Note
Identities that are set as the owners of sources, roles, or apps cannot be removed or disabled. You will see an error if you attempt to take these actions on an owner. Select a new owner to remove these identities.
Enabling User Identities
If a user has been temporarily removed or disabled because of an underlying issue, they must be reenabled after the issue has been resolved to regain access to IdentityNow.
To enable a single user:
-
In the Admin interface, select Identities > Identity List.
-
Select the name of the user you want to enable.
-
Select the Actions menu (
) and choose Enable Identity.
To enable multiple users simultaneously:
-
In the Admin interface, select Identities > Identity List.
-
Select the checkboxes next to the users you want to enable.
-
Select the Actions menu (
) and choose Enable Identities.
Managing User Accounts
After you've aggregated users' source accounts from a supported source, you can view and manage these accounts in IdentityNow.
IdentityNow tracks the status of each user's accounts. You can view and edit these statuses by going to Identities > Identity List, selecting the relevant identity, and going to their Accounts tab.
An account can have one of the following statuses:
| Status | Definition |
|---|---|
| Enabled | The account is enabled and can be accessed by the user. |
| Pending | The account is being updated. This status typically lasts only a few seconds |
| Disabled | The account has been disabled, and the user can't access it. This may occur when an admin disables the user's account or when the user's lifecycle state changes. |
| Locked | The user's account has been locked. For example, someone may have entered an incorrect password for the account too many times. |
Disabling a User Account
If you are a Helpdesk admin or an administrator, you might need to disable a user's account on a source. For example, if a user reports suspicious activity on that account, you can disable it temporarily while investigating the problem.
Note
This disables the user's account on the source and is different from disabling the user's access to IdentityNow.
-
In the Admin interface, select Identities > Identity List.
-
Select the name of the user you want to disable.
-
Select Accounts.
-
Select the Actions menu (
) on the account you want to disable and choose Disable Account. 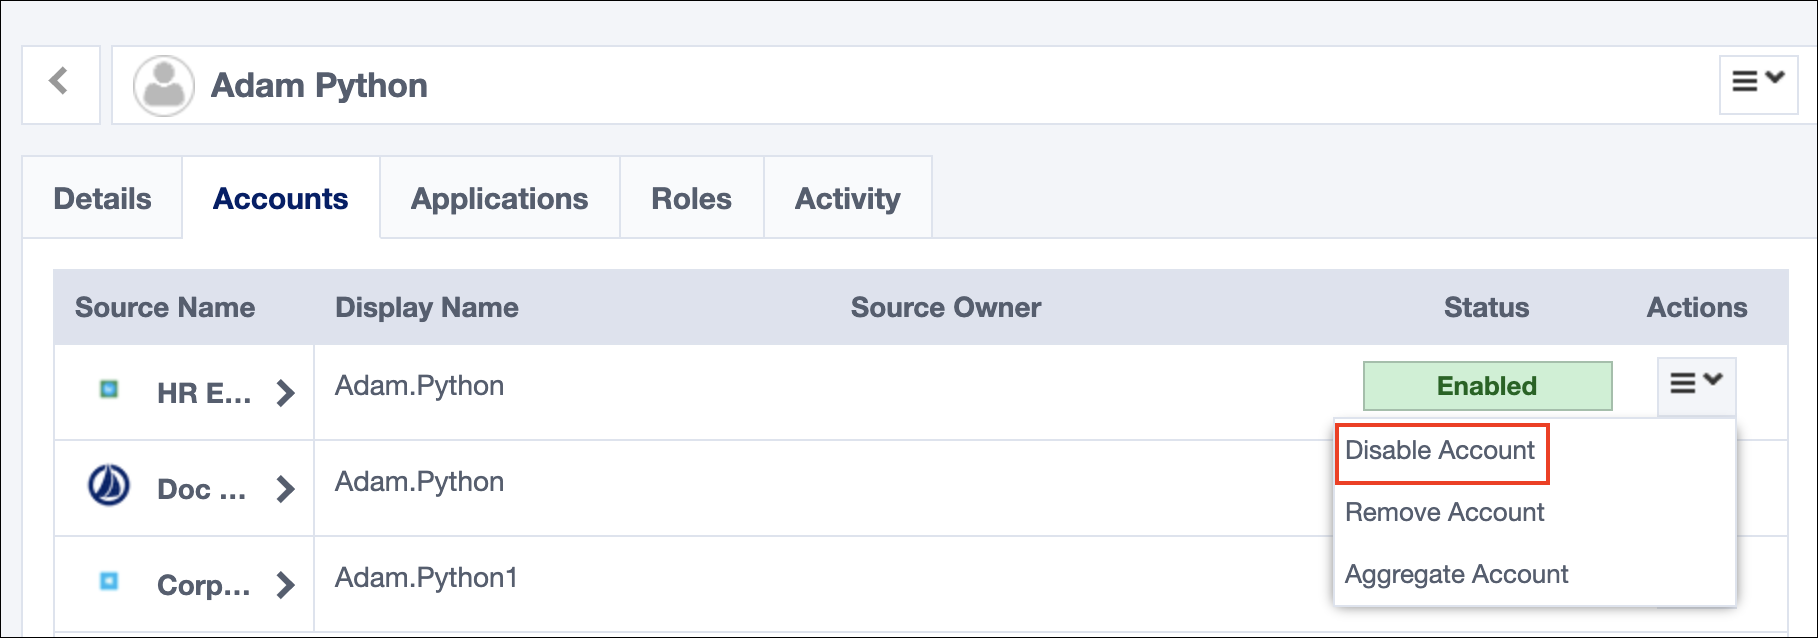
Unlocking User Accounts
If you are a Helpdesk admin or an administrator and a user has been locked out of a source account, you can unlock them from IdentityNow. This option is available for accounts that have been loaded into IdentityNow from a supported source that allows unlocking accounts.
Note
You may need to aggregate the account first to ensure that the account status in IdentityNow is accurate.
- In the Admin interface, select Identities > Identity List.
- Select the name of the user whose account you want to unlock.
- Select Accounts.
- Select the Actions menu () on the account you want to unlock and choose Unlock Account.
Removing User Accounts
You may need to remove an account from IdentityNow to fix data on the source. For example, if a user's email address was misspelled on the source, their account may correlate to another user's IdentityNow account. You can remove the account from that user to fix the misspelled email address and aggregate the account correctly. This removes the account from IdentityNow, not from the source system itself.
Note
If you remove an account from a user and that account is on an authoritative source, the user may move to a different identity profile or disappear from the identity list.
To remove a source account:
- In the Admin interface, go to Identities > Identity List.
- Select the identity you want to edit.
-
In the Accounts tab, select the Actions menu (
) beside the account you want to remove. 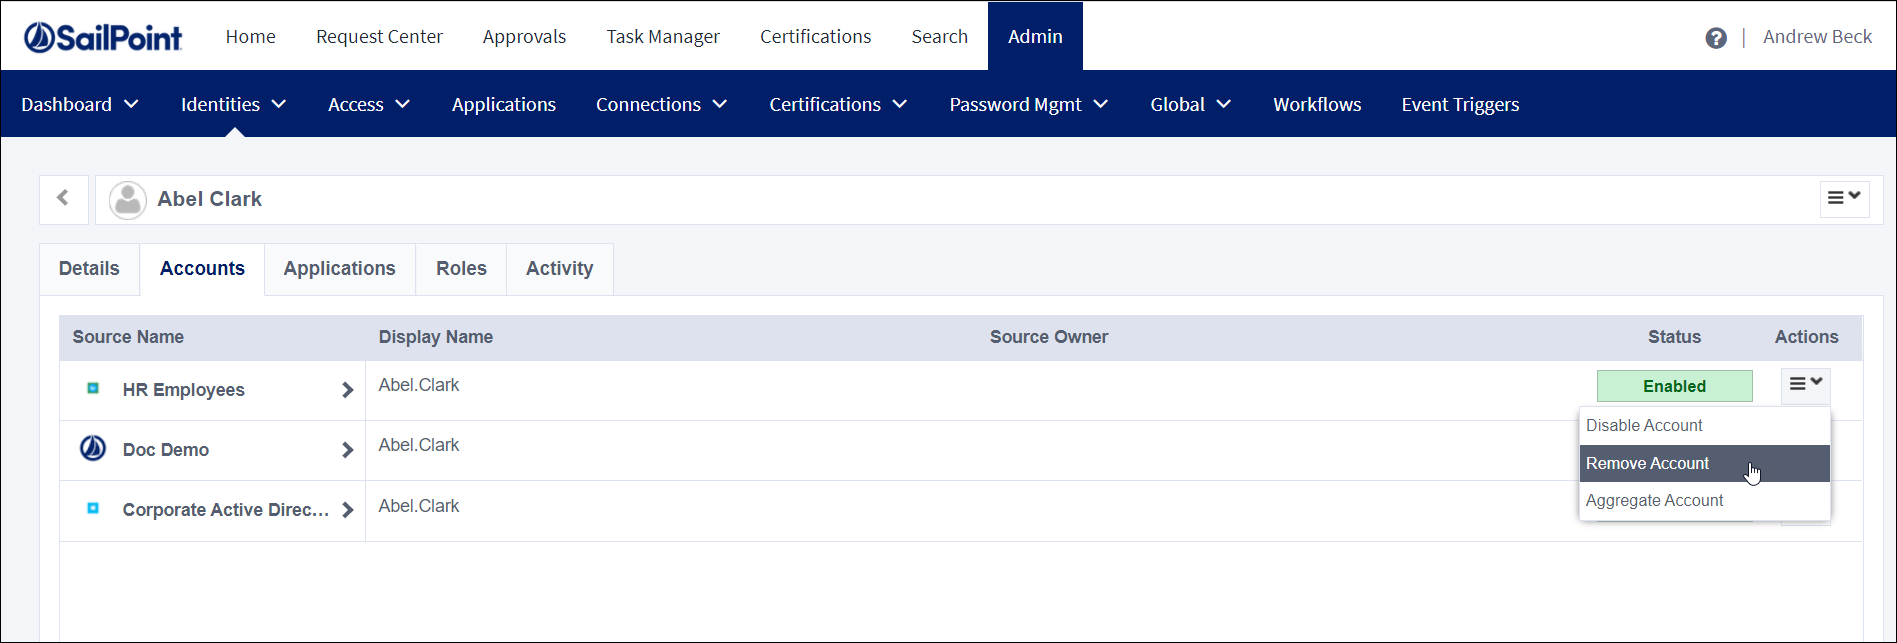
-
Select Remove Account.
-
In the confirmation window, select Yes to remove the account.
You can also remove the account from the Account Details page by selecting the account name and the Actions menu (
).The account is removed from IdentityNow and will be added again during your next full aggregation.
Note
If your source is configured for delta aggregation, you should disable it if you want to reaggregate the account.
Source: https://documentation.sailpoint.com/saas/help/common/users/user_access.html
0 Response to "An Error Has Occurred Try Again or Contact Your System Administrator Sailpoint"
Post a Comment